

⚠️ Hiking and scrambling are inherently dangerous activities. Please read my Disclaimer. ⚠️
As my summer of exploration on the Flatheads continues, I have to give a big shoutout to All Stone Adventures for providing the route for Darrah S3. I’ve never met this fellow backcountry enthusiast and have only recently discovered his video trip reports, but it looks like we share the same interests for obscure peaks in the Castle and Crowsnest Pass – which from my perspective, is super cool. 😁 He has completed several of the peaks on my ‘To Do’ list, so I’m looking forward to using his information when I ascend them myself. Thanks All Stone!
I also have to mention how invaluable Joey Ambrosi’s, Southern Rockies Trail Guide, has been for me over the years. His routes into locales such as North and South Lost Creek are a ‘go to’ for trip planning and though some details have changed over time, they have saved me a ton of trial and error. Moreover, besides writing about hiking and fishing in the area, Joey has also championed lacrosse in the Crowsnest Pass for many, many years, providing youth in the area with access to one of best sports around. He truly epitomizes true community spirit and involvement. Thanks Joey!
The route into and up both Darrah S3 and Darrah SE4 is remarkably straightforward and both peaks are easy to reach. I had originally suggested Darrah SE4 as the day’s destination via the South Lost Creek trail with a potential scramble up its eastern slopes (which I still may come back to try). However, Andrew alerted me to All Stone’s recent ascent of Darrah S3 and suggested that as the objective, to which I readily agreed after watching the video.
Riding our bikes in for the first 7 km saved us a tremendous amount of time and after only 3.5 hours, found ourselves on the summit of S3 and noting the proximity of SE4. After making a painfully slow traverse – it may have been better to have just descended S3 to the valley floor – we soon found ourselves making the easy hike to the summit of Darrah SE4.
We did look at the possibility of trying for Darrah S4, but it would have to be from the col with SE4 and there are a few sections that may or may not be negotiable. It was nothing that we would try at the end of the day and if I do come back to try, I will bring a rope and gear (and Brad) just in case. S3 also gave us the chance to check out our old nemesis, Darrah S2, from up close. Seeing no route from S3, we still think a possible route may be found between the summit and the western outlier. If you find a way – or know of a way – let me know!
All in all, this was another fine day of exploration in the mountains with a great friend!
Be sure to read Andrew’s trip report!

To get to Darrah S3 & SE4, drive south from the hamlet of Beaver Mines along Highway 774 for ~15.5 km until you come to the Lynx Creek (Ohagen Road) turnoff on your right (just past the Beaver Mines Lake turnoff). Turn and follow the Ohagen Road for ~1.8 km until you come to a fork and a sign that says to turn left to reach Lynx Creek. Keep going for ~7.7 km until you come to a T-intersection. Turn left and follow the Carbondale River Road for ~2.6 km until you come to a fork with an information sign and a large area to camp just beyond it. Take the right fork (Lost Creek Road) and follow it for ~4 km until you come to a bridge. Either park here, or if you have a higher clearance vehicle, drive for another ~200 m to reach the trailhead which is marked by a large information sign. The road to the left will lead you to the Lost Creek Shelter which is where we parked.
As I mentioned, the trailhead is next to the information sign and it is an easy to follow ATV trail. There are a number of junctions along the way with the first being only a couple hundred metres from the trailhead. Keep left here and cross the small bridge. A couple of kilometres later, the trail continues to the right, while the old trail is cordoned off as a reclamation area. At ~3.6 km from our starting point at the shelter, the road forks again and so keep left. After going around a hairpin, the trail will then begin to descend and around the ~4.8 km mark from the shelter, it comes to another junction, where you keep left again. You will eventually come to a recently constructed metal bridge over North Lost Creek. Continue over it and follow the trail as it continues to the right. After ~453 m, you will come to another junction and a gate. Keep going straight and past the gate, and follow the trail for ~4 km to the open meadow at the base of S3. Here is where the trail ends. In total, from our vehicles to the terminus of the trail, it was ~10.7 km.
Depending on where you choose to ascend, it is about ~1.4 km (~325 m elevation gain) to reach the snow-filled tarn. From the tarn we found it easiest to ascend a well-worn gully for ~1 km (~180 m elevation gain) to the col beneath the summit of S3. From here, several trails lead up the steep slope for ~400 m (~116 m elevation gain) to the summit.
To get up SE4, I’d recommend not trying to traverse like we did or at least going down closer to the valley floor. From the floor to the col, it is a ~1 km (~263 m elevation gain) hike. From the highest point of the col, it is a pleasant, ~1.6 km (~155 m elevation gain) trip to the summit. We were tempted to drop down to the trail from the top, but the thought of bushwhacking made us change our minds. Instead, it only took us 45 minutes to travel from the summit of SE4 back the way we came, to the trail. That sure beats bushwhacking! We returned the way we came.

Our total roundtrip distance was 32 km with total elevation gains of 1625 m. Our total roundtrip time was 9 hours and 6 minutes.

Approximately 200 m after crossing the bridge, the Lost Creek Road comes to a fork. The trail is the ATV track on the right, while the road itself continues to the left before terminating at the Lost Creek shelter.

Our parking spot at the Lost Creek Shelter.

Andrew starts up the North Lost Creek trail. Overall, this would end up being more of a bike-friendly trip than North Kootenay Pass.

About 250 m from the trailhead, the road forks. We kept to the left to stay on the North Lost Creek trail.

Two things to note about this area: 1) it is grazing land and depending on the time of year, there may be cattle all over the place. We kept encountering Black Angus (or Limousin) which made for some fun times when they suddenly ‘popped out’ from the trees; 😂 and 2) there are numerous riparian zone reclamation projects underway that are clearly marked with ‘Do Not Enter’ signs. These are long-term habitat projects and should be avoided.

Getting our first good view of the Flatheads. Darrah S3 is the small peak on the far left, with Darrah S2 to immediately to its right. In the centre is Mount Darrah, while Mount Pengelly and Mount McGladrey are to the right.

Arriving at the point where a section of trail has been closed off for riparian reclamation. We would continue along the trail that curves to the right.

Darrah S3 (far left) still seems far away, but it only took us 1 hour and 50 minutes to cover the ~10.7 km from our vehicles to the base of S3.

Approximately 3.6 km from our vehicles, we came to another fork. We would keep left to remain on the trail.

After rounding a hairpin curve, the trail begins a steady descent for ~1 km (63 m elevation loss). I was worried that this would suck to bike up at the end of the day, but it turned out to be much better than I thought.

At the ~4.8 km mark from our vehicles, we encountered another junction. We would continue to the left.

Now on more level ground alongside North Lost Creek and getting a good look at S3 (centre). (Photo by Andrew Nugara)

Crossing the bridge over North Lost Creek.

We kept to the right after crossing the bridge to remain on the trail.

Approximately ~453 m after crossing the bridge, we came to a junction and this gate. It is closed to prevent motorized vehicle access but open to snowmobiles in the winter. We would continue past it for another ~4 km to reach the base of S3.

Easy biking for the first kilometre past the gate.

Remember when I said that black cows kept popping out from the trees? Perhaps it was a ‘moooot’ point? 😉

At the ~7 km mark from our vehicles we ditched our bikes and set off on foot. Here, Andrew crosses a stream bed that earlier in the year, would probably be full of water.

Arriving in the bowl at the base of Darrah S3.
It was a gorgeous morning to be in the mountains!

Gazing up at S3 from the trail. There are multiple ways to ascend from here.

Andrew heads over to investigate a waterfall. It was so pretty that we would end up ascending next to it. It think it was steeper than other possible routes, but it was way more scenic.

I ended up snapping a ton of photos of it, though I really have to remember to hold the shutter open longer to blur the water.

There were no worries about where to go for a refill.

Looking back to the base of the waterfall and along the trail.

To me, this rock resembled the head of a great white shark, specifically like the one in Jaws when it was attacking Quint’s boat. Hmmm, maybe I shouldn’t have drank from the waterfall… 😉

Ascending a dry gully next to the stream…

And now back to ascending alongside the stream.

The view back and across the bowl to Darrah SE4, our other destination for the day.

Gazing up at another waterfall.

Andrew (right) joins me above the start of the stream.

Heading towards S3 which is in front of Andrew.

The tarn that sits below Darrah S4 was still full of snow.

From the tarn, the route up S3 is straightforward.

We found it was easier to ascend inside the gully and then on descent, use the scree next to it. From the tarn to the col it was about 1 km with a ~180 m elevation gain.

I discovered a Pokeball on the way up. 😂

At the col between S4 and S3 and staring at our old nemesis, S2.

There were a number of trails that led towards the summit from the col. (Photo by Andrew Nugara)

Gazing back at the col and S4 (left) as we follow a trail towards the summit ridge. From the col to the summit it was approximately 400 m with an elevation gain of ~116 m.

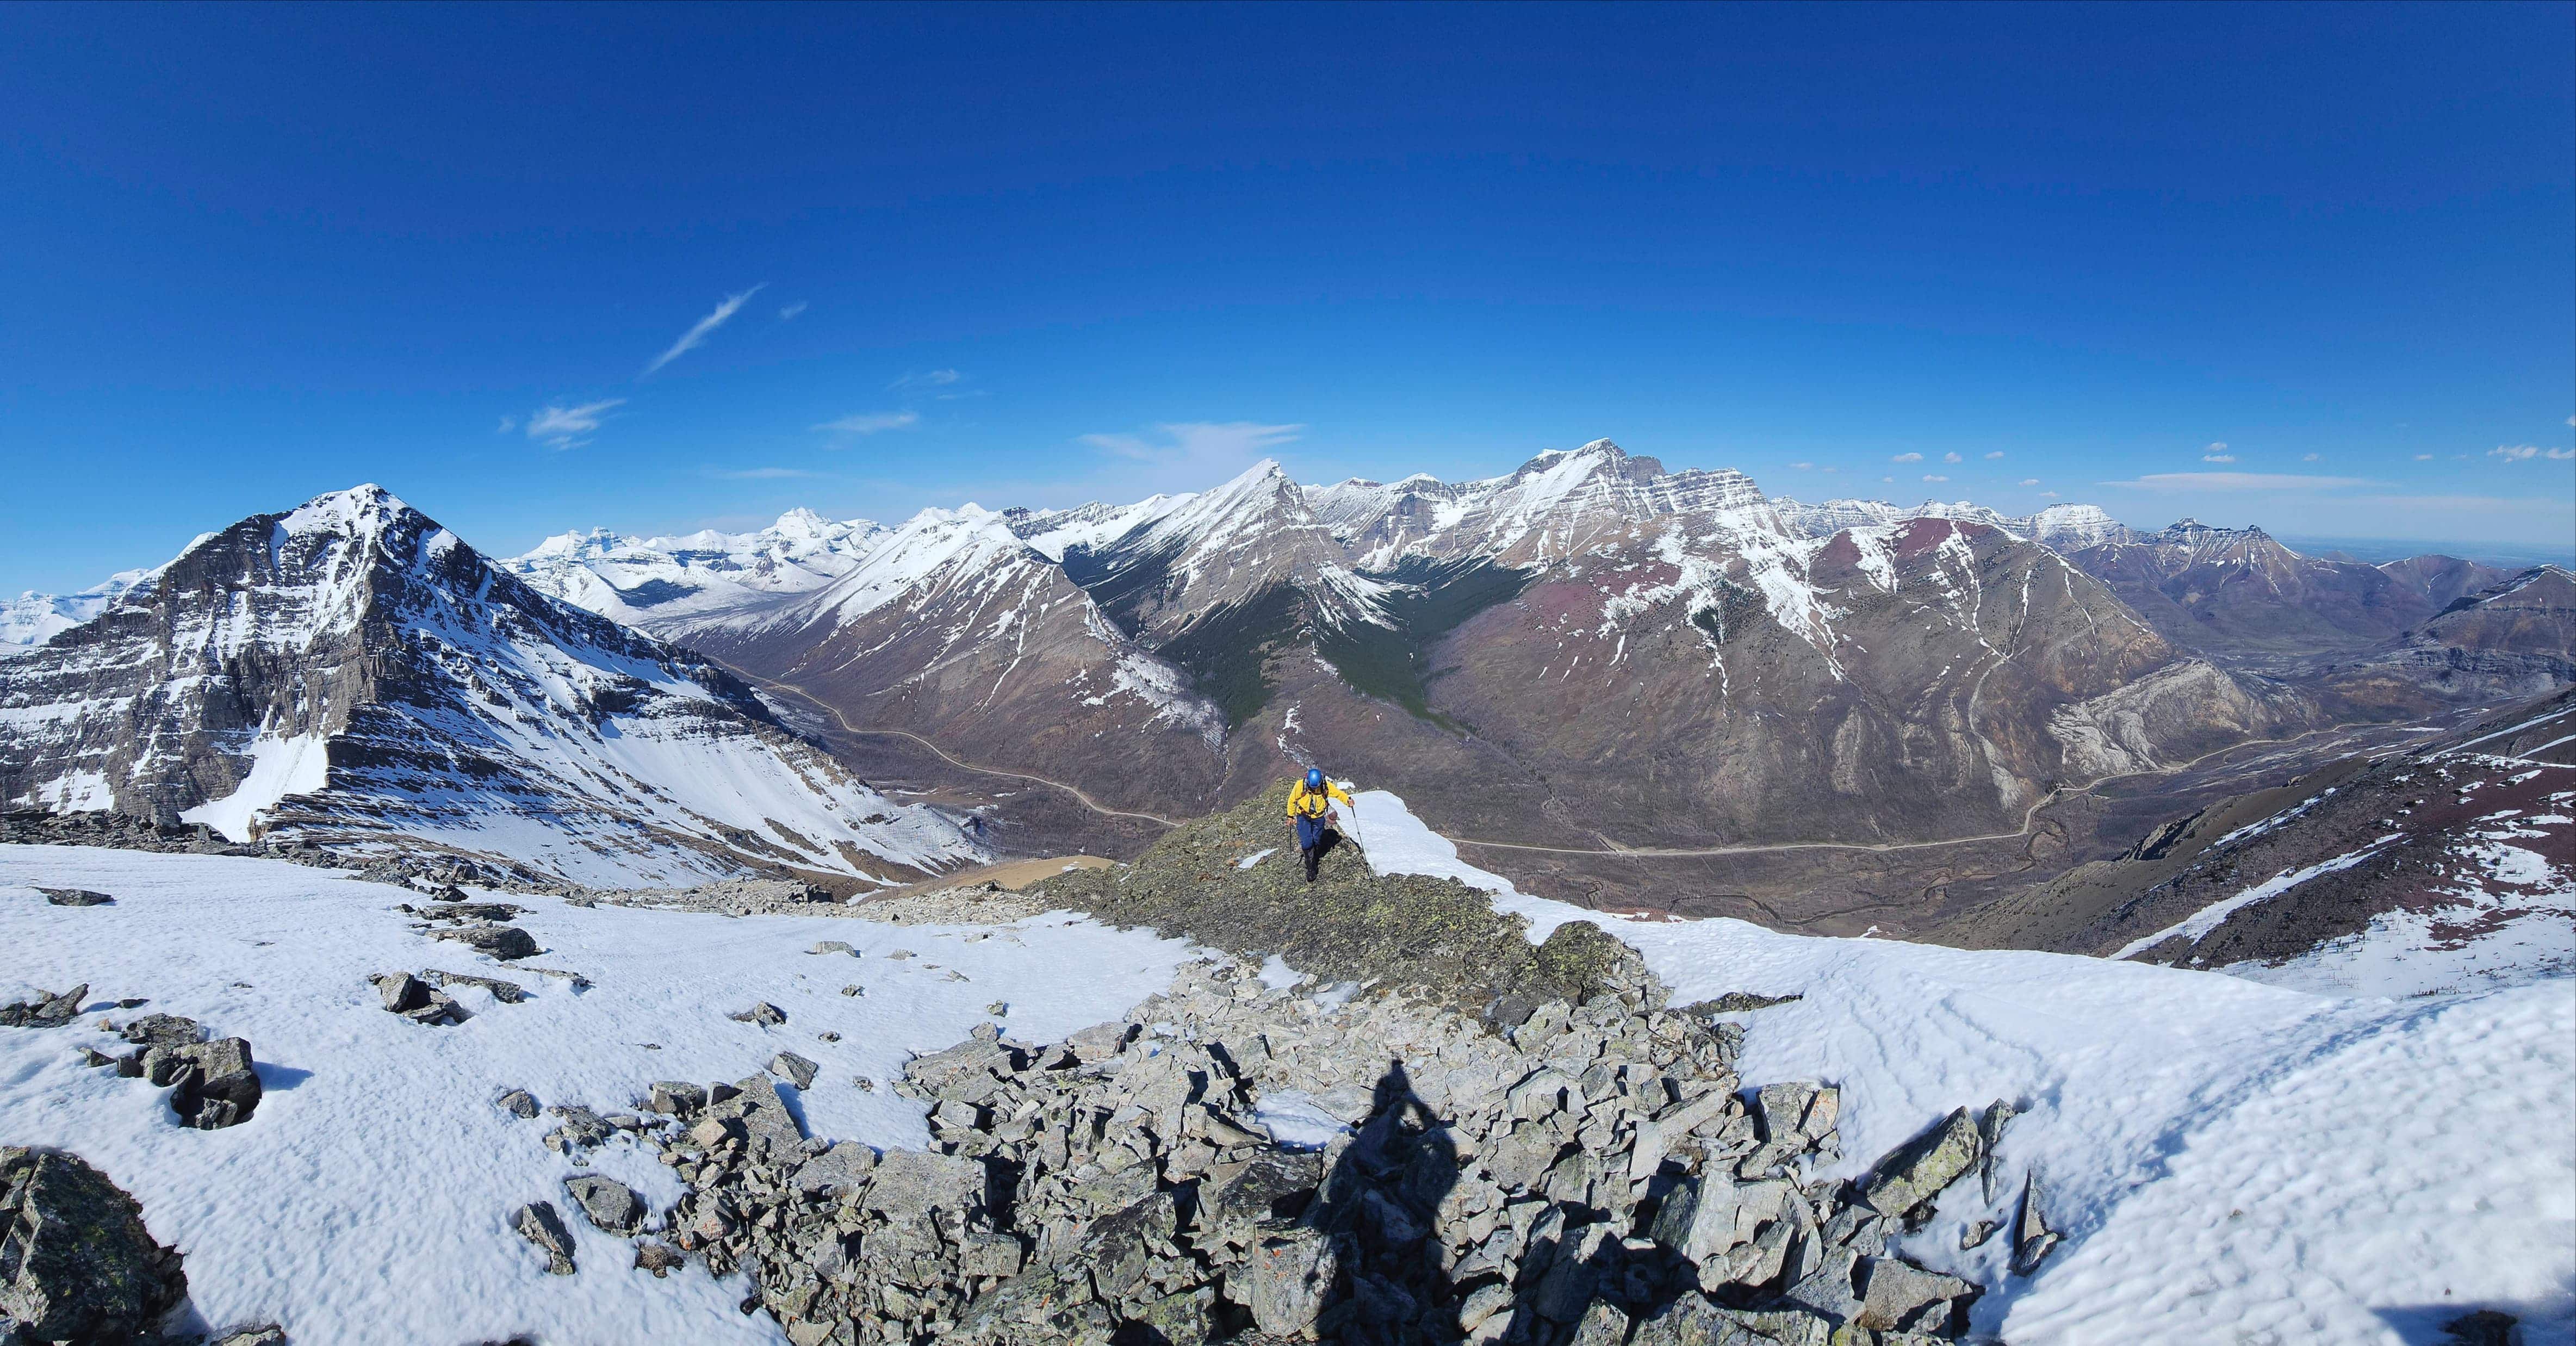
On the summit ridge and making the easy hike to the top.

A wide angle view back as I near the summit. We thought about trying to reach S4 (centre) in addition to S3; however, after taking in a more comprehensive view, we determined that it would be next to impossible from S3. There may be a way from the south though…

Approaching the summit of S3. The ridge narrows to include a bit of exposure just prior to the summit.

The summit of Darrah S3 (2456 m).

A wide angle to the north…

To the northwest…

To the east…

To the southeast…

To the south…

And finally, to the west.

A telephoto of Barnes Peak.

Darrah S2 is one of the largest peaks in the area. Last year, Andrew and I were thwarted by the skyline ridge on the left. As we descended, we thought it might be possible to use the steep slope beneath the outlier to reach the col, though the terrain is sketchy. From this direction, it looks to be the only way unless the gully in the centre can be used earlier in the season when it is filled with snow. However, even if one of these routes worked, I’m not sure if there is even a route to the summit from the col…

Gazing past S2 towards S1 and Mount Darrah itself.

A closer look at the tarn we visited on our S2 trip. This valley has a good trail in from the Corbin Road.

A closer look at S1 (centre) and Mount Darrah.

The view across the valley to our next destination of the day, Darrah SE4.

A couple small tarns sit beneath S3.

A hazy telephoto of Mount McCarty and behind it, Syncline Mountain.

A good look at Centre E3 which sits at the entrance to North Kootenay Pass.

A telephoto of Hollebeke Mountain with Centre SE1 on the right.

From left to right: Centre SE1, Centre N1, and Centre Mountain. Andrew and I failed to reach Centre SE1 a few weeks ago, but it still ended up being a good trip.

A telephoto of Mount Corrigan.

If I zoom in enough on this photo of Darrah S4, I think I can see a cairn on the summit – which would be a good sign. Getting to it as a scramble from S3 would not be something that I would ever want to attempt.

Andrew chillin’ on the summit. No really. The wind was really, really cold.

Every day is a gift from God! If I glossed over this before, cancer has made it salient. (Photo by Andrew Nugara)

My transcribed thoughts as I check for an alternate route up Darrah S2 – “Hello darkness my old friend, I’ve come to talk with you again…” 😂 (Photo by Andrew Nugara)

After a windy lunch on the summit, it was time to leave. Click to follow us to Darrah SE4.


Leave a Reply