
⚠️ Hiking and scrambling are inherently dangerous activities. Please read my Disclaimer. ⚠️
“Deadman Peak” is the nickname that Jeff and I have given to an unnamed, 2562m summit located in the High Rock Range directly to the west of Crowsnest Mountain and directly to the north of Mount Tecumseh across Deadman Pass – hence the name. There are actually two peaks, but as we found out, the slightly higher peak to the north is inaccessible from the southern peak. I’ve had this destination on my radar for several years because it is quite a prominent feature in the Crowsnest Pass, but I’ve never been able to find a trip report for it. Since neither of us particularly care if our chosen destination has been ‘officially’ named, we had no hesitation in deciding to explore a route up this intriguing mountain. What we discovered was a highly enjoyable ridge walk coupled with great summit views. It was definitely a worthwhile trip!
Edit 25 August 2016: I noticed that So Nakagawa (a.k.a. soistheman) has also posted a trip report about this peak. He ascended it in 2013, but did not published his report until August of 2015 – a month after our trip. I would definitely encourage people to read it as he uses a slightly different ascent route. I would also recommend Andrew Nugara’s trip report from July 2016.

Quick recap: our route followed Deadman Pass Trail until we reached the first avalanche slope at the southern end of the mountain. From here we scrambled up ~550m to gain the ridge. We then followed the ridge north to the base of Deadman Peak where we used goat trails to traverse to a steep gully which we then used to scramble up to the summit.
The details: to reach our starting point from Lethbridge, turn north off of Highway 3 onto the Allison Creek Road just west of Coleman. Once you reach the end of the pavement and cross the cattle guard, continue straight for another ~4.8km until you come to a short road that leads into a large clearing on your left hand side. Here is where we parked our vehicle. Deadman Pass Trail begins on the western end of the clearing.

Deadman Pass Trail is a popular recreational route that leads across the Continental Divide into BC. Surprisingly, we did not encounter a single ATV and as a result, enjoyed a peaceful 3.86km walk to the base of the mountain. We used the first avalanche slope that we came to as our ascent route up to the ridge. The route from the trail to the ridge is steeper than it appears and care must be taken while scrambling because the quality of the rock is poor. There is also an abundance of annoyingly loose scree. Our journey along the ridge (or “the Great Wall”) to our summit route was an enjoyable ~1.57km ridge walk. On our way back, we debated dropping directly into the valley beneath the summit, but opted instead to retrace our route along the ridge to minimize any potential bushwhacking. Before we reached the end of the ridge, we decided to descend what looked like a scree slope back to the trail. The usable scree soon disappeared only to be replaced with sections of scree covered slab. This made our egress off of the mountain more difficult.
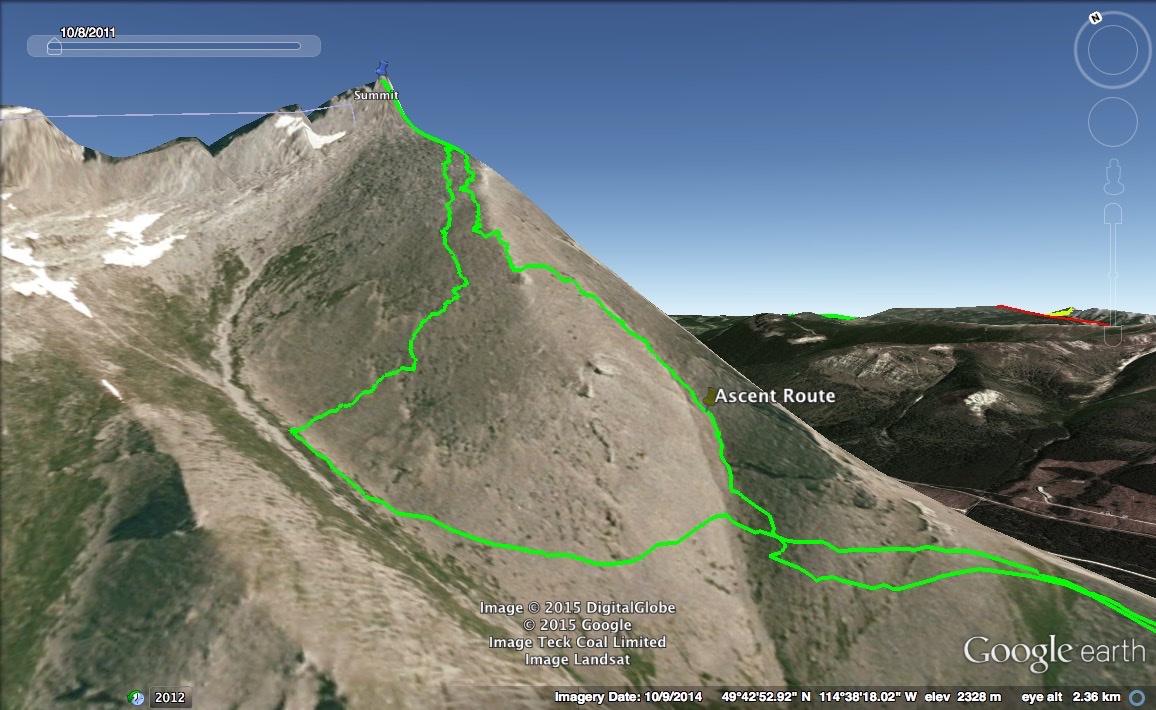
Goat trails made it possible for us to traverse from the ridge to our ascent route without losing elevation. We chose to go up the first gully that we came to and descend to a second gully further to the NW. In hindsight, it may have been better to follow the second gully as far as possible and then attempt to ascend from there, though there are several sections of slabs in this area so I can’t say for certain if it would be a viable way to ascend. We stuck to the solid rock in our ascent gully for as long as we could until we came to nothing but loose scree. From here we migrated over to a small ridge comprised of mostly solid rock which we then used to gain the summit ridge. This whole section is deceptively steep and progress was slow.

Our total distance travelled was 15.3km with total elevation gains of 1168m. The one way distance from our vehicle to the summit was 7.44km. Our roundtrip time was 8 hours and 46 minutes.

Deadman Peak as viewed from our starting point just off of Allison Creek Road. Our route followed the entire ridge from left to right. I was told by my friend Clay, that this section is sometimes referred to as “The Great Wall” which would make sense. In all honesty, I’m sure that our First Nations friends have had a name for this mountain for centuries but none of us have asked what it is and so we naively assume it is ‘unnamed’.
The trail to reach the base of the mountain is visible at the far end of the clearing. Note the incredibly awesome rooftop tent on the Toyota HiLux just to the right of Jeff.

Shortly after leaving the clearing, the trail swung left and crossed Allison Creek.

Sentry Mountain (left) and Mount Tecumseh (right) soon came into view. Travel along Deadman Pass Trail is easy and the further you go, the more scenic it becomes. One source indicates that the name, Deadman Pass, is in reference to 40 US Cavalry soldiers who were ambushed here in the 19th century. This is highly spurious and what is more likely, is that the name was imported from an event which occurred outside of the region – perhaps involving the US Cavalry and the Nez Perce in Montana. Ian McKenzie speculates that this same event may also be related to the naming of Nez Perce Creek. (http://www.crowsnestheritage.ca/Newsletters/June_2010_ENewsletter.pdf).

We stayed left at the first fork we came to.

When we encountered a second fork, we once again stayed to the left . The trail will soon begin to make a long, but gradual descent into Deadman Pass.

Looking back towards Crowsnest Mountain after we had descended into the Pass.

When we came to a third fork in the road, we continued straight ahead.

This is the sign located at the third fork.

Shortly after we passed the third fork, the trail turned briefly into a creek. (Photo by Jeff Lang)

About ~3km into the trip, a shallow, but beautiful lake appeared next to the trail. The water was crystal clear and several moose tracks could be seen along the bottom.

After hiking for 3.86km, we came to the first open slope that led up to the ridge. This is where we left the trail and headed for the band of rock at the top.

Looking up at the first rock band that we encountered. I mistakenly thought that I could tackle it from the right until I discovered that the rock was too frail to provide enough decent holds. Jeff gained the ridge fairly quickly by keeping to climber’s left while I found myself stymied 3m up on the rock face. I then had to down climb and backtrack to the base where I then proceeded to use Jeff’s route.

This is where Jeff found an easier route to the top of the first rock band – by keeping to the climber’s left. “Alexander Creek Mountain” is in the background.

The scree above the first band of rock was quite loose so we stuck as close as possible to the sections of exposed rock. Here, I’m ascending out of a small gully. (Photo by Jeff Lang).

After ~550m of climbing we finally gained the ridge (a.k.a “The Great Wall”). Deadman Peak is in the distance (~1.57km away) with the summit located on the right. We were surprised to find a small concrete cairn on top of the first point along the ridge (foreground). It looked like it might have been a surveyor’s marker at one time, but anything other than the concrete base had long since vanished. Someone had built a small cairn on top of the high point pictured on the right, but this was far from being the highest point along the ridge, so I’m guessing that this was the turnaround point for a previous party.

Jeff stands next to a small cairn (2180m) that we found along the ridge. This was not the high point on the ridge. From left to right, Mount McLaren, Mount Coulthard, Mount Parrish, Chinook Peak, and Mount Tecumseh.

This pano stitched together rather poorly, but it does give a sense of the view from the cairn to the north. The Seven Sisters are on the right.

Looking east towards the Seven Sisters and Crowsnest Mountain.

Another view to the south from the cairn. Turtle Mountain, Hillcrest Mountain, Willoughby Ridge, and “The Saddle” are visible in the distance to the left.

Jeff leaves the cairn behind as we continue our enjoyable ridge walk towards the base of the summit.

The ridge gradually gains elevation along its entire length, especially as it approaches the base of Deadman Peak. Our ascent route would go up the gully on the far right.

Several goat trails meant that we did not have to lose elevation while traversing from the ridge to the ascent gully. (Photo by Jeff Lang)

Our ascent gully. This route is deceptively steep but we were able to avoid a bit of scree bashing by sticking as closely as possible to the exposed rock inside the gully – at least for a while. When we ran out of usable rock we migrated to the ridge on left.

Part way up the gully, Jeff pauses to examine a fossil.

Jeff approaches the point in the gully where we ran out of solid rock and began to head towards the small ridge located to the climber’s left.

Once on the ridge, it was easier to ascend but make no mistake, it was a steep slog at times. The summit is not visible.

Jeff looks down on me from near the summit ridge. Around this point, my quads had begun to cramp which slowed my progress (I forgot to hydrate properly the day before). With temperatures in the high 20s, both of us ended up consuming about 4l of fluids. Our route along the ridge is clearly visible in the background. (Photo by Jeff Lang)

Jeff reaches the summit well ahead of me.

Jeff on the summit of Deadman Peak (2562m). Not finding a cairn, Jeff built one while he was waiting for me to join him on the summit. We would supersize this iteration before we left, however, we did not have anything that we could use as a container to host a registry. I would name the cairn, Brad.

My GPS readings on the summit.

Looking east at the Seven Sisters and Crowsnest Mountain from the summit. In the distance on the right is Bluff Mountain and Saskatoon Mountain. Centre Peak is visible in the distant centre and Thunder Mountain is on the far left.

Looking north along the High Rock range at Allison Peak (just to the left of the cairn). Racehorse Mountain is visible immediately to the right of Allison. Deadman’s twin peak can be seen to the right of the cairn. In case you are wondering, it did not look even remotely possible to make the trip over to it from the summit. It would probably be best to approach the second peak from the north or the west.

Looking southward from the summit. Mount Ptolemy is the tall peak on the far left. Sentry Mountain, Mount Tecumseh, Phillipps Peak, “Shooting Star Peak”, Loop Ridge, the Natal Fire Lookout, and Mount Erickson (far right) are also visible. In the foreground centre of the picture sits “Alexander Creek Mountain”. On our way back, we would descend the scree slopes on the left to the vegetation covered bowl below.

A close up view of Mount Erickson.

The views of the surrounding area were excellent.

Another great view of the Crowsnest Pass and probably one that is not too common. The Livingstone Range, the Castle Crown, and the north end of the Flathead Range are all visible from the summit. We were thankful that the haze that was present earlier in the day from forest fires had cleared by the time we reached the summit.

Another pano looking to the south. Deadman Peak is actually 13m higher than Mount Tecumseh (centre left). “Alexander Creek Mountain” looks very distinct from this angle.

The summit is very small and is surrounded by sheer cliffs immediately to its west, north, and east (pictured). To quote the immortal protestations of Father Dougall McGuire, “Careful now!” – everyone’s watched the popular ’90s Irish TV comedy, Father Ted, right?

On the summit of Deadman Peak (2562m). From left to right: Allison Peak, Racehorse Mountain, and Deadman’s slightly higher twin peak.

Jeff and I on the summit. This was my first attempt at using the selfie stick that I received for Father’s Day – which I guess now makes me a bane to society.

After spending about 30 minutes on the summit and enjoying the views, it was time to leave.

Instead of retracing our ascent route, we decided to descend scree slopes to the bottom of the bowl.

Looking back from the ridge. Our ascent route went up the gully on the far right while our descent route reached the vegetation covered bowl on the left. From the bowl, we used goat trails to traverse back to the ridge. We debated dropping all the way into the valley below and bushwhacking our way back to the trail, but we decided that we would walk the ridge one more time.

A beautiful late afternoon walk along “The Great Wall”. (Photo by Jeff Lang)

Near to where we originally gained the ridge, we decided it would be a good idea to drop down this avalanche slope to the trail below.

Unfortunately, what we couldn’t see from above was the slabby lower section of the slope which made for a tedious descent. (Photo by Jeff Lang)

Looking back at Jeff as he navigates his way down the slab covered slope.

The final section of bushwhacking at the bottom of the avalanche slope before reaching the trail.

While bushwhacking, we came across what appeared to be a popular scratching tree for the area’s resident bear population.

There was much rejoicing when we finally reached the trail.

The early evening sunlight and the lack of ATVs made for a peaceful and scenic 4km return trip along Deadman Pass Trail.

After 15.3km and 8 hours and 46 minutes, we finally arrived back at our vehicle; capping off a fun day of exploration. Deadman Peak was not all sunshine and roses, but the long and scenic ridge walk coupled with the great views from the summit, far outweighed the negatives. Even the short hike in along Deadman Pass Trail was well worth our time. I’m not sure if many people visit Deadman Peak (“The Great Wall” probably sees more traffic), but this intense experience of beauty and diversity once again reminded me as to why I love the Crowsnest Pass.


Leave a Reply