
⚠️ Hiking and scrambling are inherently dangerous activities. Please read my Disclaimer. ⚠️
Without a doubt, this will go down as one of my most memorable trips to date. For years I’ve gazed at Mount Ptolemy from surrounding peaks with the hope of one day making it to the top. Most recently, I spent several hours with it front and centre as I reascended Chinook Peak with my good friend, Brad Wolcott. On that trip, Brad recounted how he and Dave Fuller – two of the best alpinists I know – had made a fourth attempt to ascend Ptolemy using a snow couloir up the north face. They made it two-thirds of the way to the top, before terrible rock stymied their progress. Their conclusion was that unless someone spent several days cleaning and bolting the route prior to ascent, the north face was not viable.
Prior to this, Brad and Dave’s attempts at Ptolemy were mostly from the east, where they explored various routes in search of a viable technical ascent. It was only after exhausting each of these, that they settled on the southwest ridge as a consolation prize, since it had previously been documented as a scramble by Sonny Bou. That they were forced into this route meant that their loss was my gain, as this opened up the opportunity for me to join them on a more ‘tame’ ascent. 😁
In addition to Sonny, David P. Jones includes the southwest ridge of Ptolemy in, Rockies South Volume 1, where he rates it as a 4th class “climber’s scramble” with an avoidable, low 5th class down-climb from the false summit. However, it is Sonny’s 2008 trip report, that provides the best – and pretty much the only – detailed information available on this route. Raff Kazmierczak, who used a variation of Sonny’s route, also provided information through text a few days prior to our trip, so a massive thank you to both men for sharing their knowledge. I will also note that Jones includes the east ridge as an alternate 4th class scramble, but both Brad and Dave say it is so full of atrocious rock, that even with technical gear it’s not worth the risk.
Indeed, this is the crux of the matter. Ptolemy – like most mountains in the area – is comprised of horrible rock. By horrible, I mean that you have to check every hold at least three times to make sure it won’t give way. When coupled with slabs, ball bearing scree, and lots of exposure, this mountain shouldn’t be taken lightly. It is not for the inexperienced, impatient, or ill-prepared. In fact, even though the summit sits only ~900 m from the false summit, it took us 3 hours to navigate the intervening southwest ridge, followed by another 2 hours to return back to the false summit. Therefore, perfect weather combined with lots of daylight are critical factors for ascent, as there are few places to shelter and even fewer options for escape.
At 2812 m, Ptolemy is the highest peak in the Crowsnest Range and is second only in height to Piinaquiium / Ahkoinimahstakoo (Mount Blakiston) (2910 m) among the mountains located between the Crowsnest Pass and the Canada/US border. For reference, nearby Omahkai’stoo (Crowsnest Mountain) is 2785 m while just to the south, prominent Mount Darrah sits at 2755 m. From the 1870s to 1914, it was unofficially referred to as Mummy Mountain because it and its Northwest Ridge resemble a recumbent Pharaoh when viewed from the west – with Ptolemy being the head and the Northwest Ridge his folded arms. In 1914, the Interprovincial Boundary Commission changed the name to Mount Ptolemy (after the ancient Greek astronomer) because there were Pharaoh peaks elsewhere in the Rockies. (source)
I’m going to straight up say, that had I not been with Brad and Dave, I would have balked at down-climbing the gully inside the notch prior to the summit ridge. Up to this point, it was difficult but manageable scrambling with nothing outside of my abilities. Yet, even if I white-knuckled it down and across the exposed scree gully, I would never have tried climbing the steep slabs onto the summit ridge because of the extreme exposure. One slip and that might be it, so my hat goes off to the skill and fortitude of Raff and Sonny (along with Bob Parr), who tackled this crux as a scramble. Everyone’s perception of risk is different, but with the combination of ball bearing scree and exposure, my internal, ‘Pee-My-Pants Meter’, was definitely off the charts.
However, with rope and some well-placed pitons – which are the only things that will work in this rock, and even then, finding a suitable placement is dicey – the exposure was mitigated and we were able to tackle the both the gully and the crux with a measure of confidence. Indeed, watching Dave and Brad set up a route over the crux was a master class in alpinism that reaffirmed my recent practice of bringing technical gear onto unfamiliar peaks in the Flathead area.
I also need to mention the power of teamwork. Outside of Brad and Dave – and you can never have enough Daves 😁 – accompanying us were Dave’s friend, Keenan Geer, who I first met on an ascent of Anderson Peak back in 2020, and Brandon Boulier, who I just met last weekend at the trailhead for Jutland Mountain. Though Keenan remained at the false summit because he was recouping from a recent injury, having this team of guys made for a positive mindset. When it was just the four of us on the ridge, it was a great mix of encouragement, positivity, humour, and skill as we problem-solved our way past obstacles. My only regret is that Andrew Nugara was not able to join us, as he would’ve added even more to an already great team – and ensure that I wasn’t the only one who was at least a decade older than everyone else. 😂
As usual, I learned a lot from my companions; though one thing I haven’t clued in on yet, is to swap out my worn Superfeet insoles that I keep reusing from one pair of boots to the next. By the time I reached the treeline on descent, my heels felt like hamburger and I began to lag behind the others. Fortunately, everything else that mattered felt good. I want to pass along a HUGE thank you to Dave, Brad, Brandon, and Keenan for a most excellent mountain adventure. I felt honoured to be there when Dave and Brad finally kissed the summit cairn – and each other – on Ptolemy. 😂 Thanks everyone!

To get to Ptolemy, we drove west of Summit Lake in the Crowsnest Pass for ~7 km until we came to the junction with the Corbin Road on our left. We then followed this road for ~20.5 km until we came to a small dirt road on our left just prior to a set of railroad tracks and subsequently, Andy Good Creek. This is the start of the access road to Mount Ptolemy, the Ptolemy Pass trail, and the headwaters of Andy Good Creek.
As the area has recently been logged, the road has been altered somewhat from previous maps and descriptions. It is also very rough in places, and so we were thankful to have high clearance vehicles. We ended up following the dirt road for ~1.5 km – keeping left at the first couple of junctions – before heading right and along a new road that led towards Ptolemy. However, shortly beyond a junction with a road leading up the slope to our left, the new road came to an end, being deliberately deactivated by the resource company. This deactivation is further noted by a bright yellow sign. Therefore, the large clearing at the junction is where we started from.
From our parking spot, we noted that we were a short distance from the original road that ran parallel to the new road. A short walk across the clearing brought us to the original road, which we then hiked for ~1 km until we could see an obvious drainage leading off the mountain. Here is where we left the road to head towards the drainage and by doing so, came across the deactivated road and a large gravel area serving as its terminus. This meant that we could have followed the new road directly from our parking spot, and on return, we did exactly that, as it too, was a short ~1 km hike.
From the gravel terminus, we trended climber’s right and across a clearcut before crossing the drainage and gaining the right bank. We were now on Sonny’s ascent route. Almost immediately, the right side of the drainage rose sharply as it turned into a forested ridge; however, we discovered a surprisingly good trail that led us up and through the trees. Once above the treeline, we then hiked over an increasingly steep combination of rubble and slabs to reach the false summit (2638 m). For reference, from the gravel terminus to the false summit, it was an elevation gain of 1088 m over ~2.5 km that took us 3 hours and 45 minutes to complete.
From the false summit (which in and of itself is a worthy destination), the route along the southwest ridge to the summit is an imposing sight. Though the summit is only ~900 metres away as the crow flies, it took us 3 hours to reach it and then another 2 hours to return to the false summit. Our first major decision was deciding whether to attempt the down-climb described by Sonny and classified by Jones as low 5th class. We opted to bypass it to skier’s right, which meant losing ~70 m in elevation to reach the easy ramp described by Sonny.
Once back on the ridge proper, we then tackled two successive high points with the second being the trickiest to down-climb. Immediately after, the ridge narrows into a series of smaller steps; however, we were able to skirt these by dropping to our right. After regaining the ridge, we discovered that it widens considerably as it leads to the top of last high point before the notch
After a short, but careful down-climb from the high point, we arrived at the scree gully that leads into the notch. Here, we fastened two pitons and set a 20 m fixed line that angled across the top portion of the gully before dropping directly onto the floor of the notch. We then left the rope in place in case we needed it as a hand-hold on the way back.
From the notch, we then made a short climb (best rock of the whole trip) onto a ramp that led to a set of highly exposed slabs – the crux. Here, Dave moved into the role of lead climber, placing pitons along the slabs as he made his way up. Rockfall would make things tricky as we followed him up. On the way back, we discovered that it would’ve been better to tackle the slabs by angling across to the other side and then scrambling up, but either way, a slip or mistake would be very, very bad.
Once on the ridge, we had to bypass a pinnacle by dropping to our right, before regaining the narrow ridge and following it to the summit. After spending only 20 minutes on top, we returned along the ridge where we set up a sling anchor so we could rappel across the slabs. As the lead, Dave also removed the pitons that he had previously placed. After gathering our gear at the bottom, we then scrambled up the notch (much easier than going down!) and cleaned up our first rope and pitons. We then followed our route back towards the false summit.
Once we were below the false summit, we opted to again the bypass the climb, instead, retracing our route along the ramp. After regaining the false summit, we spent several minutes chatting with Keenan, before descending the way we came. Once back on the gravel terminus, we followed the deactivated road for ~1 km back to our vehicles.

Our total roundtrip distance was 10 km with total elevation gains of 1488 m. Our total roundtrip time was just about 12 hours even.

An early morning view of Ptolemy’s false summit from our parking spot.

Heading across a short clearing to the original road.

On the original road and heading to the base of the mountain.

After hiking for ~1 km, we came to a clearing where we could clearly see the false summit and the drainage. Sonny’s route, which we followed, ascends the forested ridge (centre) on the right side of the drainage. Here is where we left the road.

We had only walked a short distance before realizing that we were heading back onto the new road.

At the gravel terminus of the new, but deactivated road. We would follow the new road back to our vehicles at the end of the day.

Brandon leads the way as we angle across a clearcut to the drainage.

Looking back shortly after leaving the road. Michel Head is in the background.

Crossing the drainage.

We were surprised to find a good trail that led us through the trees.

Heading over a very interesting slab…

That turned out to be a fossilized forest. Sonny mentioned in his trip report that he found a lot of fossils beneath the false summit, and we definitely found this to be the case.

Another look back. It was an amazing weather day with little to no wind.

I found this tooth-like rock next to the trail.

The slope was steep, but we made good time.

Brandon leads us through the upper section of the forest.

Looking across to Barnes Peak.

Getting our first glimpse of the false summit since leaving the road.

A closer look at the unofficial summit of Michel Ridge (centre) and the official summit of Michel Head (right of centre).

The ridge begins to open as we near the treeline.

Tackling our first down-climb. This was a good warm-up for what what was to come.

Arriving at treeline and getting a good look at the false summit (centre).

Dave passes the point where the ridge rises sharply.

Now on the open ridge.

Dave navigates his way through the rubble.

The slope became steeper as we neared the false summit.

Dave finds the first of many fossils.

First this…

And then this.

Starting to get some good views of the Flatheads – along with a blockhead! 😂 (Photo by Brandon Boulier)

A final look back as we near the top.

Brandon arrives on top of the false summit (2638 m). From the road to this point, it took us 3 hours and 45 minutes over ~2.5 km with a 1088 m elevation gain.

Looking along the southwest ridge to the summit. It may only be ~900 m away, but it will take us 3 hours to get there and then 2 hours to get back to the false summit.

The first of three panos looking towards the summit…

Pano #2. I am going to say that the false summit is a worthy destination in and of itself.

Pano # 3. The Northwest Ridge is on the left.

Another peak that’s on my list: Ptolemy SE5.

Looking across to Mount McGladrey (left of centre) and Mount Pengelly (right of centre).

Another peak on my list, Mount Darrah, is in the centre. To the right are Darrah S2 and Centre Mountain.

The Corbin Mine and the aptly named, Coal Mountain.

Another look at Barnes Peak (left of centre).

Gazing over to Michel Head and Michel Ridge.

Like Michel Head, Tent Mountain has also been closed off to the public as a new mining venture begins operations.

Immediately across the Corbin Road from Tent Mountain is Mount Taylor.

Gazing over to Omahkai’stoo (Crowsnest Mountain) with Chinook Peak in the foreground on the right.

A closer look at the summit and the southwest ridge. There are three distinct high points along the ridge that increase in size the closer you get to the summit.

Sorting our gear before leaving the false summit. Unfortunately, Keenan was still recouping from an injury and so he decided to stay on the false summit. (Photo by Dave Fuller)

Unlike Sonny, we chose to bypass what Jones calls a low 5th class down-climb. Instead, we would descend ~70 m to skier’s right and use the easy ramp described by Sonny.

Heading down..

Down…

And down. (Photo by Brandon Boulier)

After a few false positives, we are finally on the right ramp.

Even though it required a ~70 m loss to reach, the ramp was a great bypass. (Photo by Brandon Boulier)

Looking up at the false summit.

The ramp is extremely narrow in spots.

Glancing back at the false summit where we can see Keenan standing near the cairn.

A telephoto from the same vantage.

Brad and Dave stand at the base of the first high point as they assess what’s to come.

Climbing up to the first high point.

Keenan’s view from the false summit as we reach the top of the first high point. (Photo by Keenan Geer)

Down-climbing this high point was not difficult. However, the rock is so bad, you can’t let your guard down even when you think it’s easy.

Another look at the first high point.

Dave leads us onto the top of the second high point. (Photo by Brandon Boulier)

The down-climb off this high point has two sections and is altogether more difficult than the first.

Dave carefully negotiates the second section of the exposed down-climb…

Before climbing onto the other side of a narrow gap.

Looking back at the lower part of the second high point just beyond the gap.

Immediately after the second high point, the ridge abruptly narrows.

Glancing back at Brandon and Dave.

Keenan’s view as we start to tackle the narrow section of ridge. We quickly discovered that the rock was atrocious and that it was better to bypass it by dropping to our right. (Photo by Keenan Geer)

Bypassing the ridge.

Brandon leads us back to the ridge.

A better view of the small steps (immediately above Dave) that we avoided on the ridge.

Heading up the third high point.

So far, so good.

Our own version of the Alan Parsons Project, Keenan ‘Eye In The Sky’ Geer captures us as we near the top of the third high point. (Photo by Keenan Geer)

The ridge teases us by widening for a brief time.

Some sweet views of the Flatheads.

One last look at the short, but wide section of ridge.

Dave heads onto the top of the third high point.

Peering over the edge and into the notch. (Photo by Brandon Boulier)

Brandon down-climbs the upper section of the notch.

Looking at the other side of the notch from the top of the gully.

The gully was full of ball bearing scree, so Dave set a fixed line.

Dave heads down.

While the gully curves to the right, we would continue across it….

And then down the other side and onto the floor of the notch.

While we take turns heading down, Dave heads over to check out the slabs.

Brad’s turn…

And now Brandon’s.

The other side of the gully where we down-climbed directly into the notch. (Photo by Brad Wolcott)

Brad scrambles out of the notch using the best rock of the day. (Photo by Brandon Boulier)

My turn to down-climb the notch. (Photo by Brad Wolcott)

A wider angle of the previous photo. We would leave the rope in place until we finished climbing back up. (Photo by Brad Wolcott)

Following Brandon towards the crux.

Brad and Dave climb onto the slabs.

Look back and long the ridge to the false summit.

Setting an anchor. We had brought 1 – 20 m rope that we used on the gully, and we still had 2 – 30 m ropes left. It would have been better if we had brought a 1 – 60 m for the crux as we would end up doing some creative belaying on the way up. We would join the two ropes together on the way down.

Brad belays Dave as he lead climbs the crux and places pitons.

A better view up to Dave.

My turn to belay Brad. (Photo by Brandon Boulier)
Keenan’s view as Brad heads up the crux. (Video by Keenan Geer)

With Brandon now on belay, this is my view up to Brad. You can see how steep the slabs are.

This is why we used a rope. There is a huge cliff at the bottom of slabs and given the angle, if you slip on this ball bearing scree, you aren’t stopping until you reach St. Peter at the Pearly Gates. 😳

Brad reaches the top of the crux.

Past the crux and finally on the summit ridge.

Keenan’s view of the previous photo. (Photo by Keenan Geer)

The summit is not far away…

However, we have one more obstacle to bypass.

Brandon leads us down…

And then back up and onto the ridge.

It will be smooth sailing from here.

The summit ridge is very narrow and because of the horrible rock, we couldn’t rush our progress – even though we were getting worried about the time.

A similar photo to the previous one.

A quick glance back to Brad highlights the narrowness of summit ridge.

A slightly different angle of the previous photo that shows the third high point, the second high point, and the false summit.

Keenan captures us as we make the summit. It’s too bad that he couldn’t have come with us. 😢 (Photo by Keenan Geer)

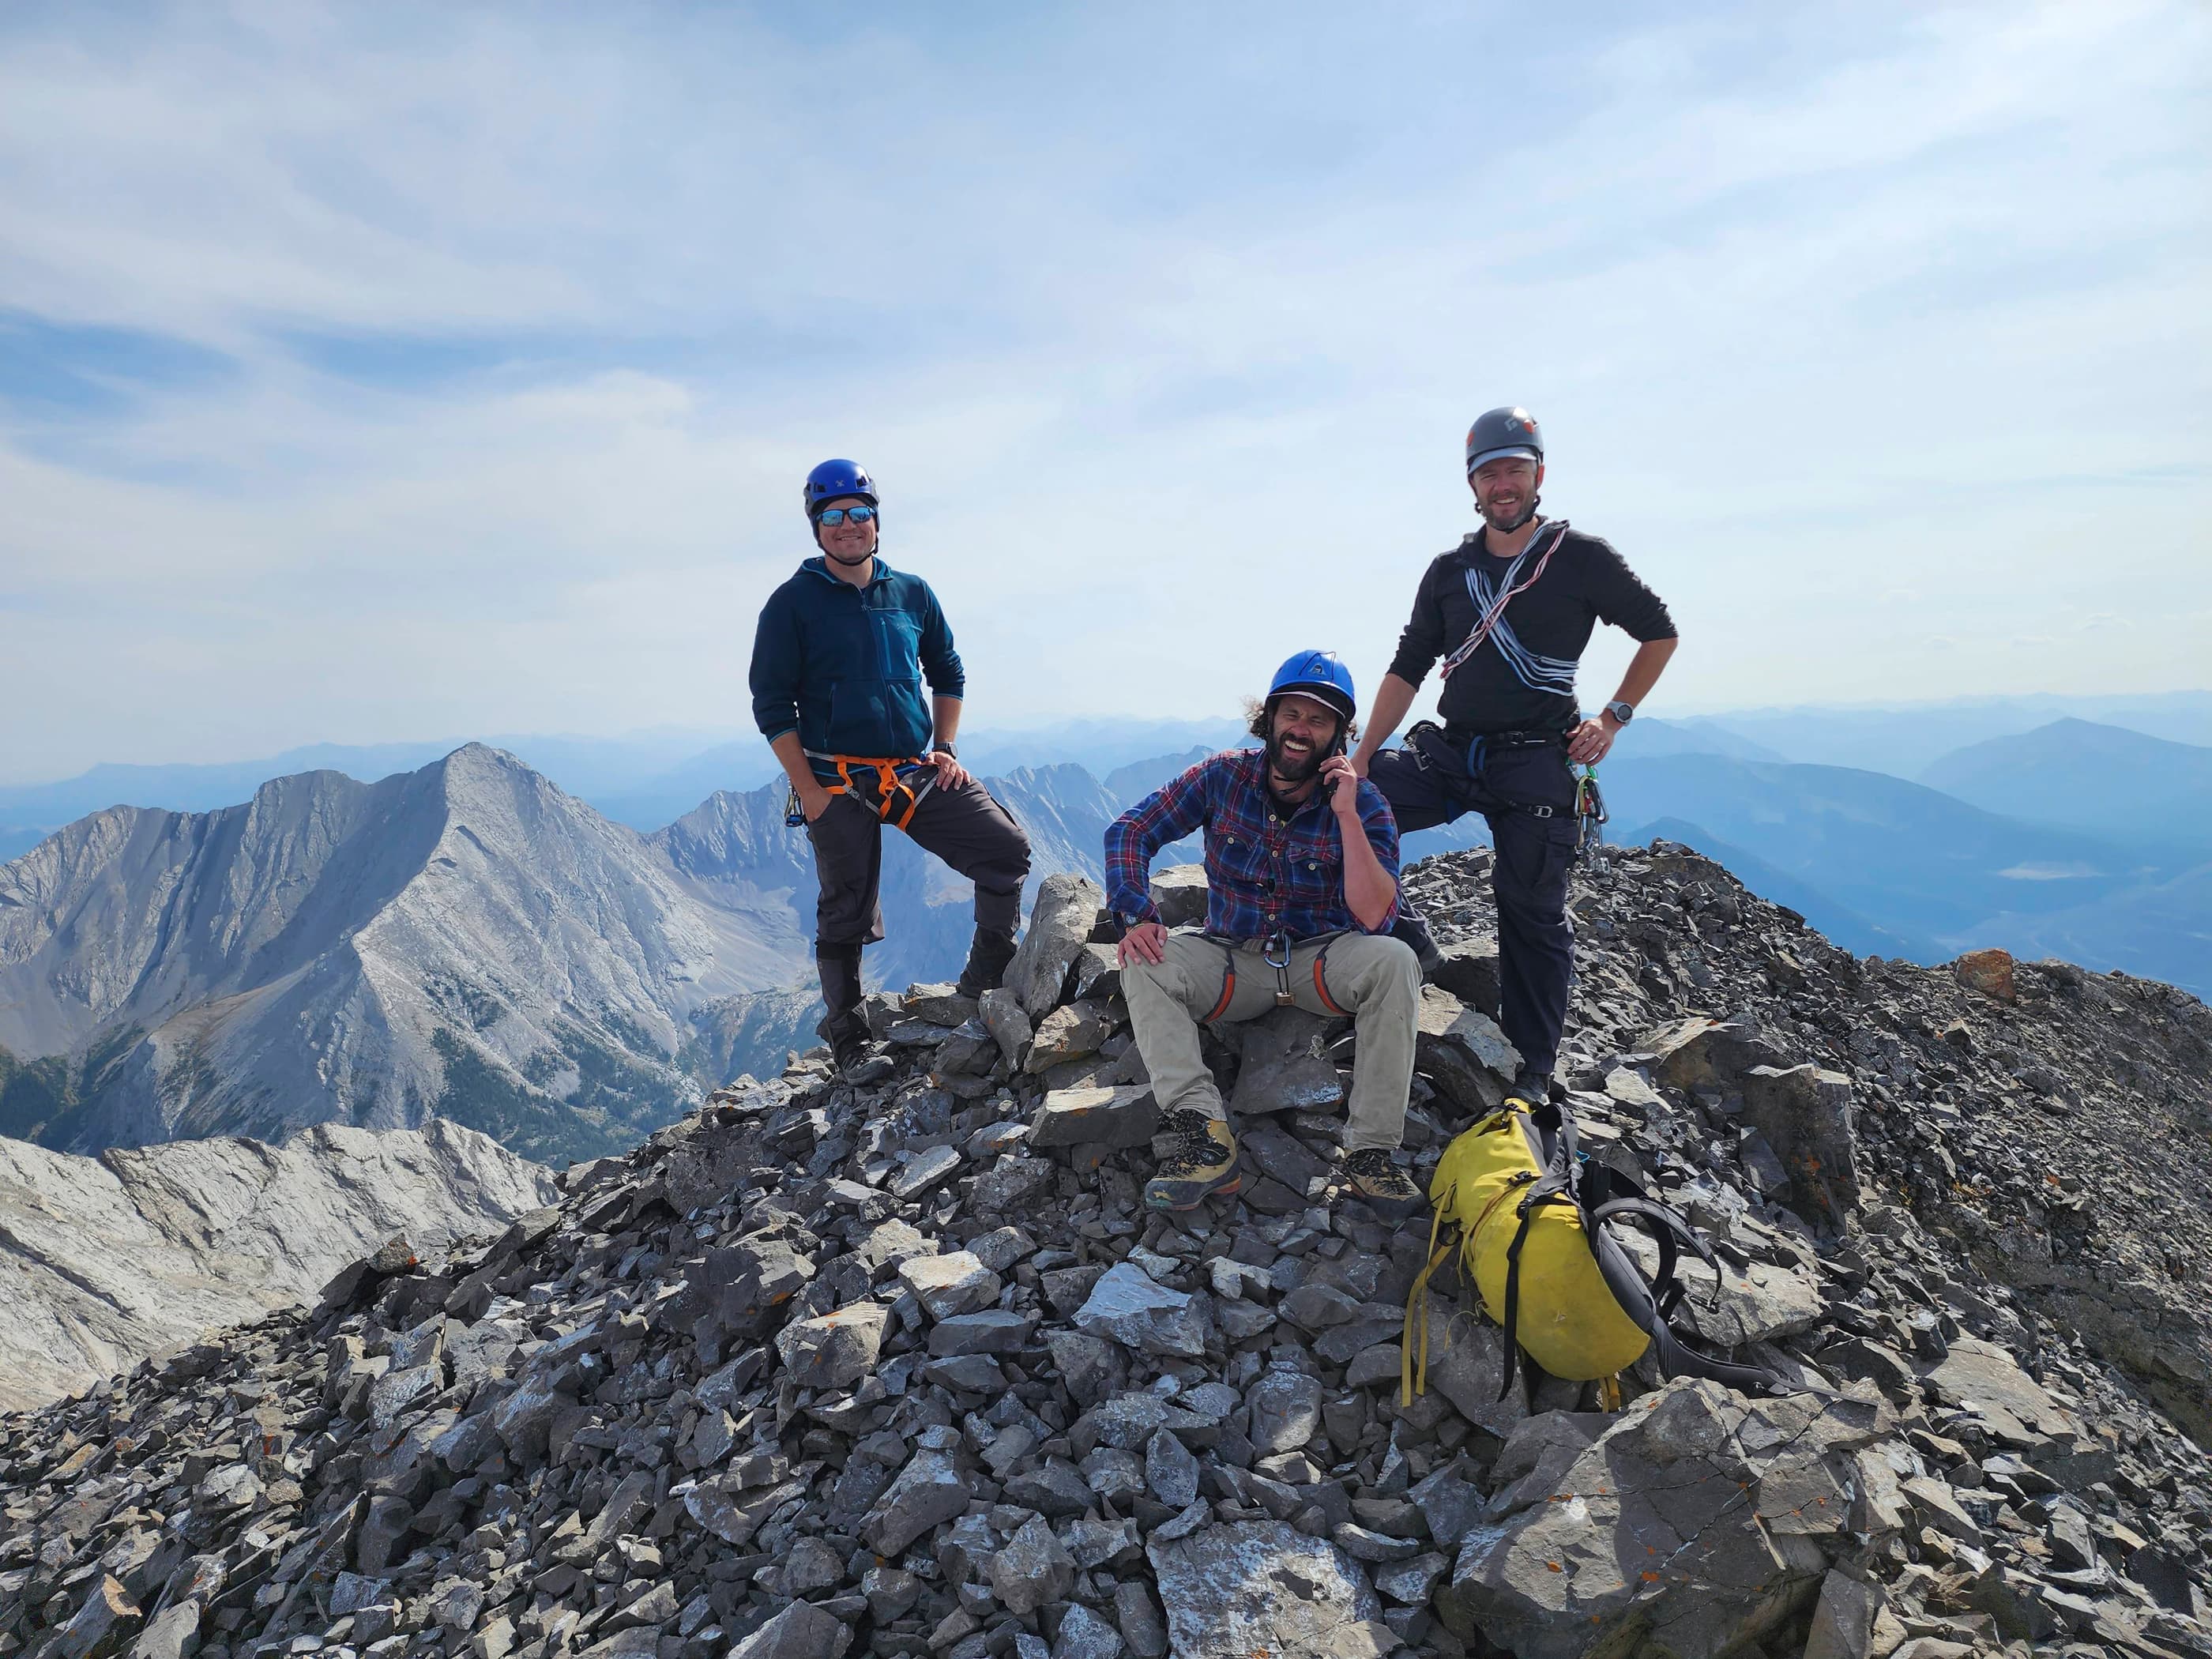
As this was Dave and Brad’s 5th attempt at Ptolemy, Brandon and I stood back to let them be the first to walk onto the summit. 👏

First they kiss the cairn…

Then Brad kisses Dave! 😂

A pano to the northeast…

And then one to the east.

Looking south…

And now to the west.

Finally, a pano to the northwest.

A closer look at the Northwest Ridge of Ptolemy that makes up the folded arms of the pharaoh when viewed from the west. This is a stellar ridge walk that includes three peaks that Brad and I nicknamed, ‘Mummy Mountain’, ‘Anubis Peak’. and ‘Pharaoh’s Peak’ in keeping with the original name for Ptolemy. In fact, ‘Pharaoh’s Peak’ is higher than Chinook Peak.

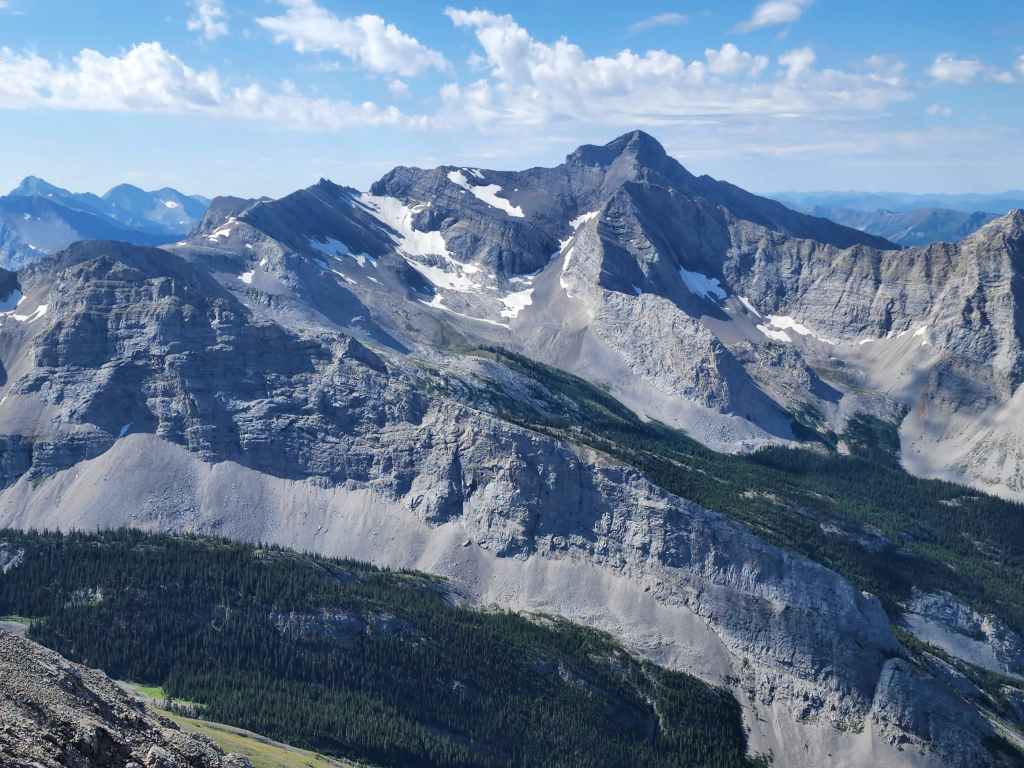
Gazing across to Sentry Mountain and behind it, Phillipps Peak and Mount Tecumseh.

A view towards Omahkai’stoo (Crowsnest Mountain) with Chinook Peak in the foreground. Ptolemy is the highest peak in the area and the second highest between the Crowsnest Pass and the Canada/US border.

Mount Parrish is a scary combination of slab and scree. Andrew Nugara is one of the only people I know who have ascended it as a scramble. Edit: I ascended Parrish in July 2025, but I made a technical ascent rather than attempot a scramble. And yes, I still think that mountain is scary to attempt without pro.

The first of several photos over to Andy Good Peak and the Andy Good Plateau.

Even from Ptolemy, Mount Coulthard looks like a hippopotamus. 😂

Another look at Parrish, Andy Good, and Coulthard.

And finally, one more of Andy Good, the Andy Good Plateau, and Coulthard.

Looking over to Sunglass Mountain (left) and Peak 34 (right) that sit between Mount Coulthard and Ptolemy SE5. In the foreground is the east ridge of Ptolemy that both Brad and Dave say is not a scramble due to all the horrible rock.

Ptolemy SE5 (centre) is on my list of peaks to visit – and I’m sure as heck bringing technical gear when I do! Mount McGladrey is on the far right.

Gazing over to Mount McGladrey (left), Mount Pengelly (centre), an unnamed peak (right), and distinctive Mount Darrah (far right).

A closer look at Darrah (centre) with Darrah S1 and Darrah S2 on the right.

It was too bad that it was so hazy, because the views along the Flatheads are fantastic. In the centre is Darrah S2 followed on the right by Centre Mountain and Mount Borsato.

Mount Corrigan (centre) is also on my list.

Barnes Peak is worthwhile trip!
A 360 summit video with a special guest appearance by Dave Fuller.

Brad’s so talented that he can chat with his wife on the phone while posing for a summit photo. 😂

Basically the same photo, except I’m in this one. 😊 (Photo by Dave Fuller)

And now a selfie with all of us. I have to say, I’m super excited to finally cross this peak off my list!

As it took us 3 hours to reach the summit from the false summit, we only spent 20 minutes on top before heading back.

I pause for one last look along the Flatheads. (Photo by Brandon Boulier)

Carefully retracing our route back to the crux.

Looking back to the summit.

Brad and Dave descend to the top of the crux.

An interesting glacial till on the west side of Ptolemy.

We discovered that a better way to tackle the crux was to angle across it. Even still, without a rope, a mistake would not be good. 😳 (Photo by Brandon Boulier)

Using a sling anchor to rappel across the crux. We had to join the 2 – 30 m sections of rope to make this work.

Dave collects the pitons he placed on the way up.

Dave crosses the trickiest part…

Before making it safely back to our starting point. (Photo by Brad Wolcott)

Brad’s turn. (Photo by Brandon Boulier)

Brad and Dave used a sling because the rock was too fractured for pitons. (Photo by Brandon Boulier)

Brad approaches the tricky part.

Now it’s Brandon’s turn.

Brad’s view up to Brandon. (Photo by Brad Wolcott)

Two good friends who have tackled many, many mountains together. 😁 (Photo by Brad Wolcott)

I watch from above as Brandon continues to make his way down. (Photo by Brad Wolcott)

While Dave and I clean up the rope and gear at the base of the crux, Brandon (centre) and Brad climb the notch.

Brandon’s view from the previous photo. (Photo by Brandon Boulier)

A better view up to Brandon and Brad.

Staring down the west side from the notch.

Dave arrives at the top of the gully where he and Brad will clean up the rope and the pitons.

Brandon heads down from the third high point.

Getting closer to the narrow section of ridge.

Arriving at our bypass point.

Brandon and Brad bypass the narrow section.

Brandon’s view from the previous photo. (Photo by Brandon Boulier)

Climbing through the small gap on the second high point.

Brandon leads the way as we scramble onto the second high point.

Brad follows him up.

Brandon and Brad climb onto the first high point.

Descending the first high point to the col with the false summit.

Brandon’s view from the previous photo. (Photo by Brandon Boulier)

There’s Keenan!

Back on the ramp.

We elected to follow the bypass back to the false summit.

Dave traverses beneath the false summit.

Starting the ~70 m climb back to the false summit.

Brad found a huge boulder that was full of fossils.

A closer look at the same boulder.

Climbing up…

And up…

And up.

Arriving onto the false summit 5 hours after leaving it.

Keenan describes what he saw from his vantage. Though he had spent the last 5 hours by himself, he said he enjoyed the opportunity to rest and enjoy the views. However, he didn’t enjoy being bitten by all the spiders. 😳

Looking back along the southwest ridge.

And now another pano.

I couldn’t resist taking one more photo once the sun came out. 😁

Packing our gear while taking a quick break.

Brandon enjoys a final look at the summit.

Heading back.

Picking our way down the rubble and slabs.

Finding more fossils.

Arriving at treeline.

Looking back to the false summit.

Brad climbs the short step along the ridge.

Following the trail through the trees.

Arriving back at the gravel terminus.

Back on even ground.

We would follow the new, but deactivated road for ~1 km back to our vehicles.

The road gained a little elevation before descending most of the way back.

Crossing the point where the resource company had deliberately deactivated the road.

Arriving back at our vehicles ~12 hours and 10 km after starting out.

One last look at the false summit. This will undoubtedly go down as one of my most memorable trips to date. A HUGE and heartfelt thank you to Dave, Brad, Brandon, and Keenan for all of the laughs, all of the swearing, and all of the teamwork! 😁 It was an honour to watch Brad and Dave make it onto the summit after four previous attempts at technical routes. However, after using the tamest route, it’s easy to see why there is so little information on Ptolemy outside of Sonny’s 2008 trip report and David Jones’ book. This is simply not a mountain that you can take lightly. The mix of horrible rock, exposure, and ball bearing scree is what makes the crux and the down-climb from the notch, sphincter clenching. Personally, I would not have tackled these sections without technical gear and would’ve definitely turned back at the crux. Having this gear along with Brad and Dave’s expertise was a game changer. 😁


Leave a Reply